Dear Reader: I have more grunt work to do before I've got my testbench in perfect order. This interlude describes a change I have to make in order to power the microcontroller on the f2013 board from the testbench, and eventually a power supply in the final application, rather than from a USB-derived power supply. Nothing very interesting here, but out of these nuts and bolts are built something interesting, eventually, I hope.
As shipped, the microcontroller on the f2013 board takes its power from the USB cable, which is very nice because it avoids the need for any sort of external power supply. But in the application I'm thinking of, there won't be a handy USB port; power will have to come from somewhere else. Fortunately, someone at Texas Instruments thought about this. In between the USB-derived +3.6V power supply ("VCC") and the microcontroller's pin 1 ("VCCOUT_D"), there's a 0-ohm resistor, R1. Check it out in this snippet of the f2013 schematic (they meant "R1", not "R61", in the note):
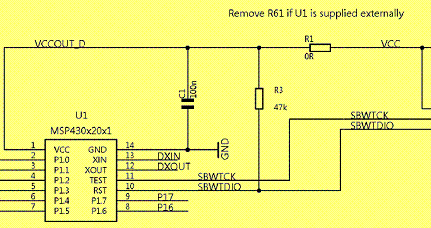
(The full schematic is on page 8, over here.)
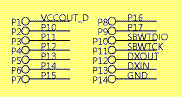
Here's another snippet of the schematic, showing how P1-P14 connect to the f2013 signals. P1, P2, ..., P14 connect to the micro's pin 1, pin 2, ..., pin14, and also to the handy 2x7 array of througholes on the f2013 board. Notice especially that P1 connects directly to VCCOUT_D.
In a previous episode, I removed one pin of the santa cruz board's connector, so that the 1c20's +5V would not connect to P1 - otherwise, I would have had a connection from the 1c20's +5V, through VCCOUT_D, to VCC (+3.6V) - that would have been bad.
In the testbench I'm constructing, the santa cruz board stands in for the universe, from the P.O.V. of the f2013 board. So, it would be a step in the right direction if VCCOUT_D came from the santa cruz board, rather than from VCC.
I have to make two hardware changes to drop my dependence on the USB-derived VCC:
- Remove R1, so VCC is disconnected from VCCOUT_D. This is a simple matter of breaking out the soldering iron and heating up R1 until it breaks loose.
- Connect a +3.3V power supply to santa cruz board J1 pin 2 (which, confusingly, connects to P1). Fortunately, the santa cruz board has a clearly labeled +3.3V supply rail, with handy through-holes. I ran a wire from that supply to J1 pin 2, and for all practical purposes, Bob was my uncle.
After making those two changes, I verified that the f2013 board does get power from the 1c20 board, that the f2013 can still be programmed via the IAR IDE over the USB cable, and that the f2013 can still drive the 1c20's LEDs. Success!